Dom & Event
dom 的全称是 document object model (文档对象模型)
Dom 树
顾名思义,它是一个树结构,如下图所示 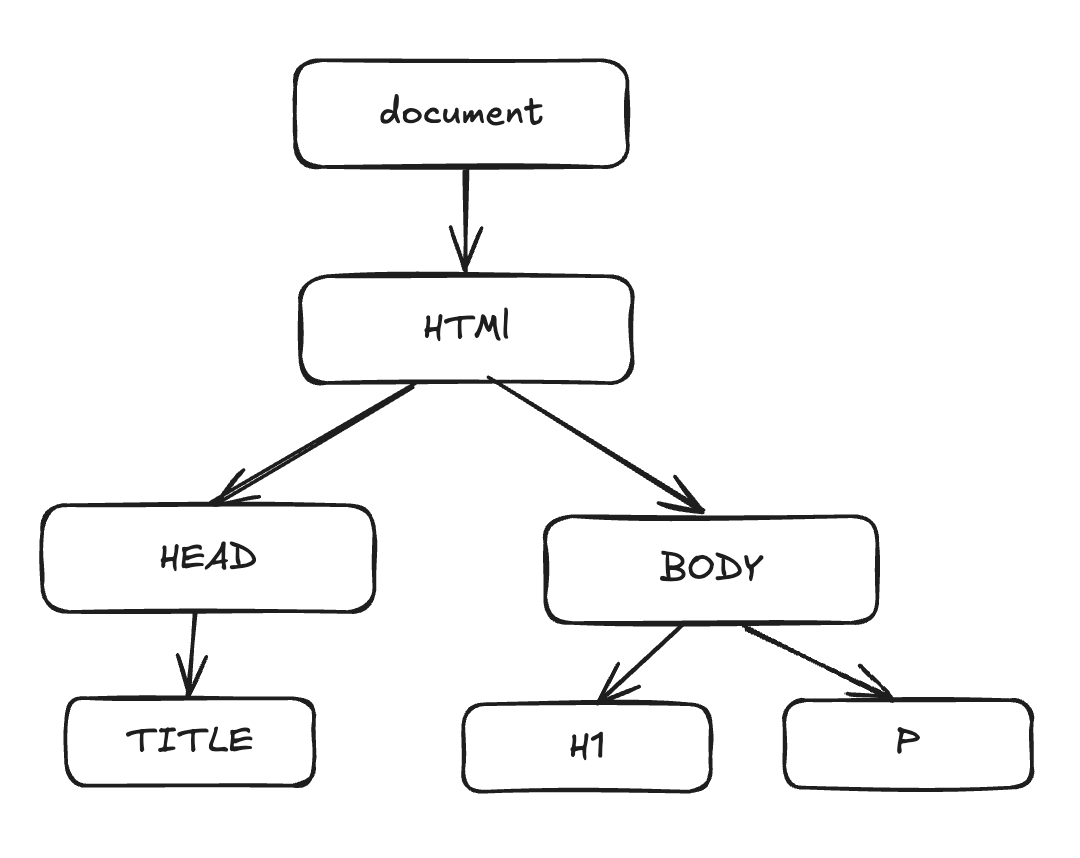
data-*
在 HTML5 中,我妈可以通过 data-* 自定义属性,它可以从 dataset 属性中获取
html
<div class="info" data-name="ice" data-age="24"></div>

<script>
const info = document.querySelector(".info")
console.log(info.dataset) // { name: 'ice', age: 24 }
<script/>
元素的大小与滚动
client
Details
html
<!DOCTYPE html>
<html lang="en">
  <head>
    <meta charset="UTF-8" />
    <meta name="viewport" content="width=device-width, initial-scale=1.0" />
    <title>client</title>
    <style>
      .box {
        width: 100px;
        height: 100px;
        padding: 10px;
        border: 5px solid skyblue;
        background-color: pink;
        /* overflow: auto; */

        /* white-space: nowrap;
        overflow-y: scroll; */
      }
    </style>
  </head>
  <body>
    <div class="box">
      This is a box.This is a box.This is a box.This is a box.This is a box.This
      is a box.This is a box.
    </div>
    <script>
      const el = document.querySelector(".box");
      console.log(el.clientWidth); // 120 -> contentWidth + paddingWidth (不包含滚动条)
      console.log(el.clientHeight); // 120 -> contentHeight + paddingHeight (不包含滚动条)
      console.log(el.clientTop); // 5 -> borderTopWidth
      console.log(el.clientLeft); // 5 -> borderLeftWidth
    </script>
  </body>
</html>- ClientWidth
contentWidth + paddingWidth (不包含滚动条) - ClientHeight
contentHeight + paddingHeight (不包含滚动条) - ClientTop
borderTop 的宽度 (上边框) - ClientLeft
borderLeft 的宽度 (左边框)
offset
Details
html
<!DOCTYPE html>
<html lang="en">
  <head>
    <meta charset="UTF-8" />
    <meta name="viewport" content="width=device-width, initial-scale=1.0" />
    <title>offset</title>
    <style>
      .box {
        width: 100px;
        height: 100px;
        padding: 10px;
        border: 5px solid skyblue;
        background-color: pink;
        /* overflow: auto; */

        /* white-space: nowrap;
        overflow-y: scroll; */
      }
    </style>
  </head>
  <body>
    <div class="box">
      This is a box.This is a box.This is a box.This is a box.This is a box.This
      is a box.This is a box.
    </div>
    <script>
      const el = document.querySelector(".box");
      console.log(el.offsetWidth); // 130 -> width + padding + border
      console.log(el.offsetHeight); // 130 -> height + padding + border
      console.log(el.offsetTop); // 8 -> margin-top
      console.log(el.offsetLeft); // 8 -> margin-left
    </script>
  </body>
</html>- offsetWidth
元素的完整宽度 -> borderWidth + ClientWidth(含滚动条宽度) - offsetHeight
元素的完整高度 -> borderHeight + ClientHeight (含滚动条高度) - offsetTop
距离父元素的 X - offsetLeft
距离父元素的 Y
scroll
Details
html
<!DOCTYPE html>
<html lang="en">
  <head>
    <meta charset="UTF-8" />
    <meta name="viewport" content="width=device-width, initial-scale=1.0" />
    <title>scroll</title>
    <style>
      .box {
        width: 100px;
        height: 100px;
        padding: 10px;
        border: 5px solid skyblue;
        background-color: pink;
        overflow: auto;

        /* white-space: nowrap;
        overflow-y: scroll; */
      }
    </style>
  </head>
  <body>
    <div class="box">
      This is a box.This is a box.This is a box.This is a box.This is a box.This
      is a box.This is a box. This is a box.This is a box.This is a box.This is
      a box.This is a box.This is a box.This is a box.
    </div>
    <div class="output">scrollTop: <span class="val">0</span></div>
    <script>
      const boxEl = document.querySelector(".box");
      const valEl = document.querySelector(".val");
      console.log(boxEl.scrollHeight); // 整个可滚动区域的高度

      boxEl.addEventListener("scroll", (e) => {
        valEl.textContent = e.target.scrollTop;
      });
    </script>
  </body>
</html>
scrollHeight 整个可滚动区域的高度
scrollTop 滚动被卷进去的高度
window 上的大小与滚动
width/height
innerWidth / innerHeight: window 窗口的宽度/高度 (包括滚动条)
outerWidth / outerHeight: window 窗口整个的宽度/高度 (包含调试器等)
滚动位置
- scrollX X 轴的滚动位置
- scrollY Y 轴的滚动位置
- scrollTo (X, Y) 页面滚动 至 绝对坐标
事件
事件流
在浏览器中,点击一个元素,点击的不仅仅是当前元素,因为会存在嵌套,元素会存在父子元素叠加层级
Details
html
<!DOCTYPE html>
<html lang="en">
  <head>
    <meta charset="UTF-8" />
    <meta name="viewport" content="width=device-width, initial-scale=1.0" />
    <title>eventStream</title>
    <style>
      .container {
        width: 150px;
        height: 150px;
        background: pink;
        .box {
          width: 50px;
          height: 50px;
          background: skyblue;
        }
      }
    </style>
  </head>
  <body>
    <div class="container">
      <div class="box">hi ice</div>
    </div>
    <script>
      const bodyEl = document.body;
      const containerEl = document.querySelector(".container");
      const boxEl = document.querySelector(".box");

      // 事件冒泡
      bodyEl.addEventListener("click", (e) => {
        console.log("bubble: bobubodyEl click");
      });

      containerEl.addEventListener("click", (e) => {
        console.log("bubble: containerEl click");
      });

      boxEl.addEventListener("click", (e) => {
        console.log("bubble: boxEl click");
      });

      // 事件捕获
      bodyEl.addEventListener(
        "click",
        (e) => {
          console.log("capture: bodyEl click");
        },
        true
      );

      containerEl.addEventListener(
        "click",
        (e) => {
          console.log("capture: containerEl click");
        },
        true
      );

      boxEl.addEventListener(
        "click",
        (e) => {
          console.log("capture: boxEl click");
        },
        true
      );
    </script>
  </body>
</html>
Bubble
事件冒泡,从内至外,默认是冒泡
.box -> .container -> body
Capture
事件捕获,从外至内,如果同时存在冒泡/捕获,会先捕获在冒泡
body -> .container -> .box
事件对象
我们可以点击元素,查看对应的属性
Details
vue
<template>
  <div :class="$style.container" @click="handleClick">
    <div :class="$style.box"></div>
  </div>
</template>
<script setup>
const handleClick = (e) => {
  console.log('target', e.target) // 1. 事件发生的元素
  console.log('currentTarget', e.currentTarget) // 2. 事件绑定的元素

  console.log('offsetX', e.offsetX) // 3. 元素内部的 x 坐标 padding起点
  console.log('offsetY', e.offsetY) // 4. 元素内部的 Y 坐标

  console.log('clientX', e.clientX) // 5. 触发点相对于浏览器窗口的 x 坐标
  console.log('clientY', e.clientY) // 6. 触发点相对于浏览器窗口的 y 坐标

  console.log('pageX', e.pageX) // 7. 触发点相对于整个文档的 x 坐标
  console.log('pageY', e.pageY) // 8. 触发点相对于整个文档的 Y 坐标

  console.log('screenX', e.screenX) // 9. 触发点相对于整个屏幕的 x 坐标
  console.log('screenY', e.screenY) // 10. 触发点相对于整个屏幕的 y 坐标
}
</script>
<style module>
.container {
  margin-top: 10px;
  width: 100px;
  height: 100px;
  background: skyblue;
  border: 5px solid purple;
  padding: 5px;

  .box {
    width: 50px;
    height: 50px;
    background: pink;
  }
}
</style>- target 事件发生的元素
- currentTarget 事件绑定的元素
- offset X/Y 元素内部的 X/Y 坐标 (padding:0 0)
- client X/Y 触发点相对于浏览器窗口的 X/Y
- page X/Y 触发点相对于整个文档的 X/Y
- screen X/Y 触发点相对于整个屏幕的 X/Y
事件委托
可以把一组元素上的事件,移动到父元素上,利用事件冒泡的机制。当子元素触发事件,冒泡到父元素中,从而达到更高的性能。
利用 data-* 的方法,给子元素绑定“唯一值”,用来区分点击了哪个元素
Details
vue
<template>
  <ul class="wrap" @click="handleClick">
    <template v-for="val in list" :key="val">
      <li :data-value="val" :class="{ [$style.grey]: selected === val }">{{ val }}</li>
    </template>
  </ul>
</template>
<script setup>
import { ref } from 'vue'

const selected = ref('1')

const list = ['1', '2', '3', '4', '5', '6']

const handleClick = (e) => {
  // 事件发生的元素
  const target = e.target
  if (target.tagName !== 'LI') return

  const value = target.dataset.value
  selected.value = value
}


</script>
<style module scoped>
.grey {
  background: var(--vp-custom-block-details-bg);
}

li {
  cursor: pointer;
}
</style>- 1
- 2
- 3
- 4
- 5
- 6
文档加载
- DOMContentLoaded:当 HTML 文档完全解析(Dom 树构建完成),且所有延迟脚本(
<script defer src="…" />和<script type="module" />)下载和执行完毕后,会触发 DOMContentLoaded 事件。它不会等待图片、子框架和异步脚本 (async) 等其他内容完成加载。 - load:用于检测完全加载的页面。